Running Nginx as a Reverse Proxy on Your OpenWrt Router
Your router already handles all network traffic. Why not let it handle reverse proxying too? Running nginx on OpenWrt eliminates an extra hop, simplifies your network architecture, and gives you a single point of SSL termination. This post covers why OpenWrt is the right choice, what nginx actually does, and how to configure it using OpenWrt’s UCI system to proxy 25+ homelab services with clean subdomain URLs.
📦 This nginx setup runs on my DeskPi 12U homelab in a 10sqm Tokyo apartment. See the full setup: Small But Mighty Homelab: DeskPi 12U Running 20+ Services.
Contents:
- Why OpenWrt?
- What is Nginx and Why Do You Need It?
- Why Run Nginx on Your Router?
- Installing Nginx on OpenWrt
- Understanding OpenWrt’s UCI Configuration
- Setting Up Wildcard SSL Certificates
- Adding Your First Service
- DNS Configuration with dnsmasq
- Real Example: 25 Services Proxied Through One Router
- Tips and Considerations
Before diving into nginx, let’s talk about why OpenWrt is the foundation that makes this setup possible.
OpenWrt is a Linux distribution designed for embedded devices, primarily routers. Unlike the locked-down firmware that comes with consumer routers, OpenWrt gives you a full Linux system with:
- Package management: Install what you need, remove what you don’t
- SSH access: Full command-line control over your network
- Customizable firewall: iptables/nftables with granular control
- Real services: Run nginx, wireguard (for remote access to your homelab), adblock, and more natively
Most consumer router firmware is a black box. You get a web UI with limited options and no way to extend functionality. OpenWrt turns your router into a proper Linux server that happens to also route packets.
Not all routers can run OpenWrt well. You need:
- Sufficient RAM: 256MB minimum, 512MB+ recommended for nginx
- Storage: Internal flash or USB storage for configs
- CPU: Modern ARM or MIPS processors handle nginx easily
Check the OpenWrt Table of Hardware to see if your router is supported.
I’m running the OpenWrt One - a router specifically designed for OpenWrt with 1GB RAM and 256MB NAND storage. It runs nginx with 25+ reverse proxy configurations without breaking a sweat.
Nginx (pronounced “engine-x”) is a high-performance web server and reverse proxy. In a homelab context, you’ll primarily use it as a reverse proxy - a server that sits between your clients and your backend services.
Without a reverse proxy, accessing your homelab services looks like this:
- Grafana:
http://192.168.1.201:3000 - Home Assistant:
http://192.168.1.213:8123 - Jellyfin:
http://192.168.1.201:8096
This approach has several issues:
- Memorizing IPs and ports is tedious
- No HTTPS means credentials sent in plaintext
- Port conflicts when services want the same port
- No centralized access control
With nginx as a reverse proxy:
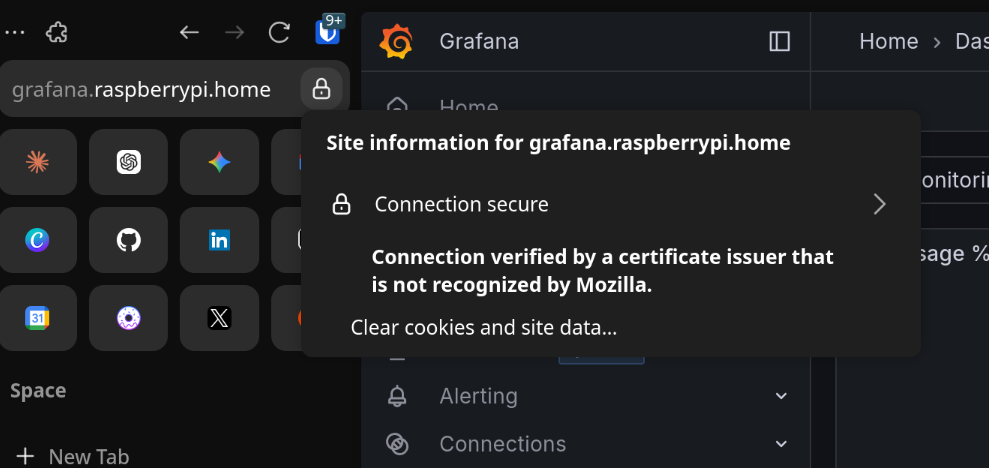
- Grafana:
https://grafana.raspberrypi.home - Home Assistant:
https://homeassistant.raspberrypi.home - Jellyfin:
https://jellyfin.raspberrypi.home
%%{init: {'theme': 'base', 'themeVariables': { 'primaryTextColor': '#000', 'nodeTextColor': '#000', 'textColor': '#000', 'nodeBorder': '#333', 'mainBkg': '#fff'}}}%%
flowchart LR
    Client["Client Browser"]
    Router["OpenWrt Router
nginx :443"]
    Backend["Backend Service
Grafana :3000"]

    Client -->|HTTPS request| Router
    Router -->|HTTP to backend| Backend
    Backend -->|Response| Router
    Router -->|Encrypted response| Client
- Client requests
https://grafana.raspberrypi.home - DNS resolves to your router’s IP (192.168.1.1)
- Nginx receives the request, terminates SSL
- Nginx looks at the hostname (SNI), routes to the correct backend
- Backend responds, nginx forwards response to client
The key insight: nginx uses the hostname (Server Name Indication) to route traffic. All services share ports 80/443, but nginx routes based on which subdomain you’re requesting.
You could run nginx anywhere - a Raspberry Pi, a VM, a Docker container. So why specifically on the router?
Every network request already goes through your router. If nginx runs on a separate machine, you add an extra hop:
%%{init: {'theme': 'base', 'themeVariables': { 'primaryTextColor': '#000', 'nodeTextColor': '#000', 'textColor': '#000', 'nodeBorder': '#333', 'mainBkg': '#fff'}}}%%
flowchart LR
    subgraph separate["Nginx on Separate Machine"]
        direction LR
        C1["Client"] --> R1["Router"] --> N1["Nginx Server"] --> B1["Backend"]
    end
    subgraph onrouter["Nginx on Router"]
        direction LR
        C2["Client"] --> RN["Router + Nginx"] --> B2["Backend"]
    end
One less hop means lower latency, less routing rules, and one less point of failure.
Your router already manages:
- DHCP (IP assignments)
- DNS (name resolution via dnsmasq)
- Firewall rules
Adding reverse proxying to this list keeps all network configuration in one place. When you add a new service, you configure the DNS entry and nginx proxy in the same system.
Your router is the one device that’s always running. If it’s down, you have no network anyway. Running nginx on the router means your reverse proxy has the same uptime as your network itself.
Modern routers have more than enough power for reverse proxying. Nginx is extremely lightweight - it was designed to handle thousands of concurrent connections on minimal hardware. My OpenWrt One barely notices the 25 proxy configurations:
              total        used        free      shared  buff/cache   available
Mem:        1011248      163144      241180      505676      606924      291924
Less than 200MB used with nginx, dnsmasq, and all other services running.
SSH into your router and install nginx:
opkg update
opkg install nginx-ssl
The nginx-ssl package includes SSL/TLS support. Without it, you can only proxy HTTP.
Enable and start the service:
/etc/init.d/nginx enable
/etc/init.d/nginx start
Verify it’s running:
nginx -v
# nginx version: nginx/1.26.1 (x86_64-pc-linux-gnu)
OpenWrt uses UCI (Unified Configuration Interface) to manage all system configuration, including nginx. Instead of editing nginx config files directly, you define settings through UCI and OpenWrt generates the actual nginx config at /var/lib/nginx/uci.conf on each restart.
Nginx configuration on OpenWrt has two parts:
- Server blocks (via UCI) - Define which subdomain to listen for and which SSL certificate to use
- Location files (plain nginx config) - Define where to proxy the traffic
A server block tells nginx: “When someone requests this subdomain, use this SSL certificate and look at this location file for routing rules.”
uci set nginx.srv_grafana=server
uci set nginx.srv_grafana.uci_enable='true'
uci set nginx.srv_grafana.server_name='grafana.raspberrypi.home'
uci set nginx.srv_grafana.include='conf.d/grafana.locations'
uci set nginx.srv_grafana.ssl_certificate='/etc/nginx/ssl/wildcard.raspberrypi.home.crt'
uci set nginx.srv_grafana.ssl_certificate_key='/etc/nginx/ssl/wildcard.raspberrypi.home.key'
uci add_list nginx.srv_grafana.listen='443 ssl'
uci add_list nginx.srv_grafana.listen='[::]:443 ssl'
uci set nginx.srv_grafana.ssl_session_cache='shared:SSL:32k'
uci set nginx.srv_grafana.ssl_session_timeout='64m'
uci commit nginx
/etc/init.d/nginx restart
The key line is server_name - this enables SNI (Server Name Indication). When a client connects to port 443 and says “I want grafana.raspberrypi.home”, nginx matches it to this server block.
The location file tells nginx where to actually send the traffic. Create /etc/nginx/conf.d/grafana.locations:
location / {
    proxy_pass http://192.168.1.201:3000;
    proxy_http_version 1.1;
    proxy_set_header Upgrade $http_upgrade;
    proxy_set_header Connection "upgrade";
    proxy_set_header Host $host;
    proxy_set_header X-Real-IP $remote_addr;
    proxy_set_header X-Forwarded-For $proxy_add_x_forwarded_for;
    proxy_set_header X-Forwarded-Proto $scheme;
}
proxy_pass- The backend server address and portUpgrade/Connection- Enable WebSocket supportX-Real-IP/X-Forwarded-For- Pass the client’s real IP to the backendX-Forwarded-Proto- Tell the backend the original request was HTTPS
Instead of managing certificates for each subdomain, use a wildcard certificate that covers *.raspberrypi.home.
On your router or any Linux machine with OpenSSL:
# Generate private key
openssl genrsa -out wildcard.raspberrypi.home.key 2048

# Generate certificate signing request
openssl req -new -key wildcard.raspberrypi.home.key \
    -out wildcard.raspberrypi.home.csr \
    -subj "/CN=*.raspberrypi.home"

# Generate self-signed certificate (valid for 10 years)
openssl x509 -req -days 3650 \
    -in wildcard.raspberrypi.home.csr \
    -signkey wildcard.raspberrypi.home.key \
    -out wildcard.raspberrypi.home.crt
Place the files in /etc/nginx/ssl/:
mkdir -p /etc/nginx/ssl
mv wildcard.raspberrypi.home.* /etc/nginx/ssl/
chmod 600 /etc/nginx/ssl/*.key
Self-signed certificates will show browser warnings until you install them. Import wildcard.raspberrypi.home.crt into your browser or OS trust store to make the warnings go away. On most systems, double-clicking the certificate file will open an import wizard.
Let’s add a complete example for Home Assistant:
Create /etc/nginx/conf.d/homeassistant.locations:
location / {
    proxy_pass http://192.168.1.213:8123;
    proxy_http_version 1.1;
    proxy_set_header Upgrade $http_upgrade;
    proxy_set_header Connection "upgrade";
    proxy_set_header Host $host;
    proxy_set_header X-Real-IP $remote_addr;
    proxy_set_header X-Forwarded-For $proxy_add_x_forwarded_for;
    proxy_set_header X-Forwarded-Proto $scheme;

    # Home Assistant specific settings
    proxy_buffering off;
    proxy_request_buffering off;
    chunked_transfer_encoding on;
    tcp_nodelay on;
    proxy_read_timeout 3600s;  # Long timeout for WebSocket connections
}
Home Assistant uses WebSockets heavily, so we disable buffering and set a long read timeout.
uci set nginx.srv_homeassistant=server
uci set nginx.srv_homeassistant.uci_enable='true'
uci set nginx.srv_homeassistant.server_name='homeassistant.raspberrypi.home'
uci set nginx.srv_homeassistant.include='conf.d/homeassistant.locations'
uci set nginx.srv_homeassistant.ssl_certificate='/etc/nginx/ssl/wildcard.raspberrypi.home.crt'
uci set nginx.srv_homeassistant.ssl_certificate_key='/etc/nginx/ssl/wildcard.raspberrypi.home.key'
uci add_list nginx.srv_homeassistant.listen='443 ssl'
uci add_list nginx.srv_homeassistant.listen='[::]:443 ssl'
uci set nginx.srv_homeassistant.ssl_session_cache='shared:SSL:32k'
uci set nginx.srv_homeassistant.ssl_session_timeout='64m'
uci commit nginx
/etc/init.d/nginx restart
Check nginx configuration is valid:
nginx -t
For subdomains to resolve to your router, configure dnsmasq (OpenWrt’s built-in DNS server).
The cleanest approach is a wildcard entry that routes all *.raspberrypi.home to your router:
uci set dhcp.@dnsmasq[0].domain='raspberrypi.home'
uci add dhcp domain
uci set dhcp.@domain[-1].name='raspberrypi.home'
uci set dhcp.@domain[-1].ip='192.168.1.1'
uci commit dhcp
/etc/init.d/dnsmasq restart
Now any *.raspberrypi.home request resolves to 192.168.1.1, where nginx handles routing based on the subdomain.
From any device on your network:
nslookup grafana.raspberrypi.home
# Should return 192.168.1.1

nslookup anything.raspberrypi.home
# Also returns 192.168.1.1
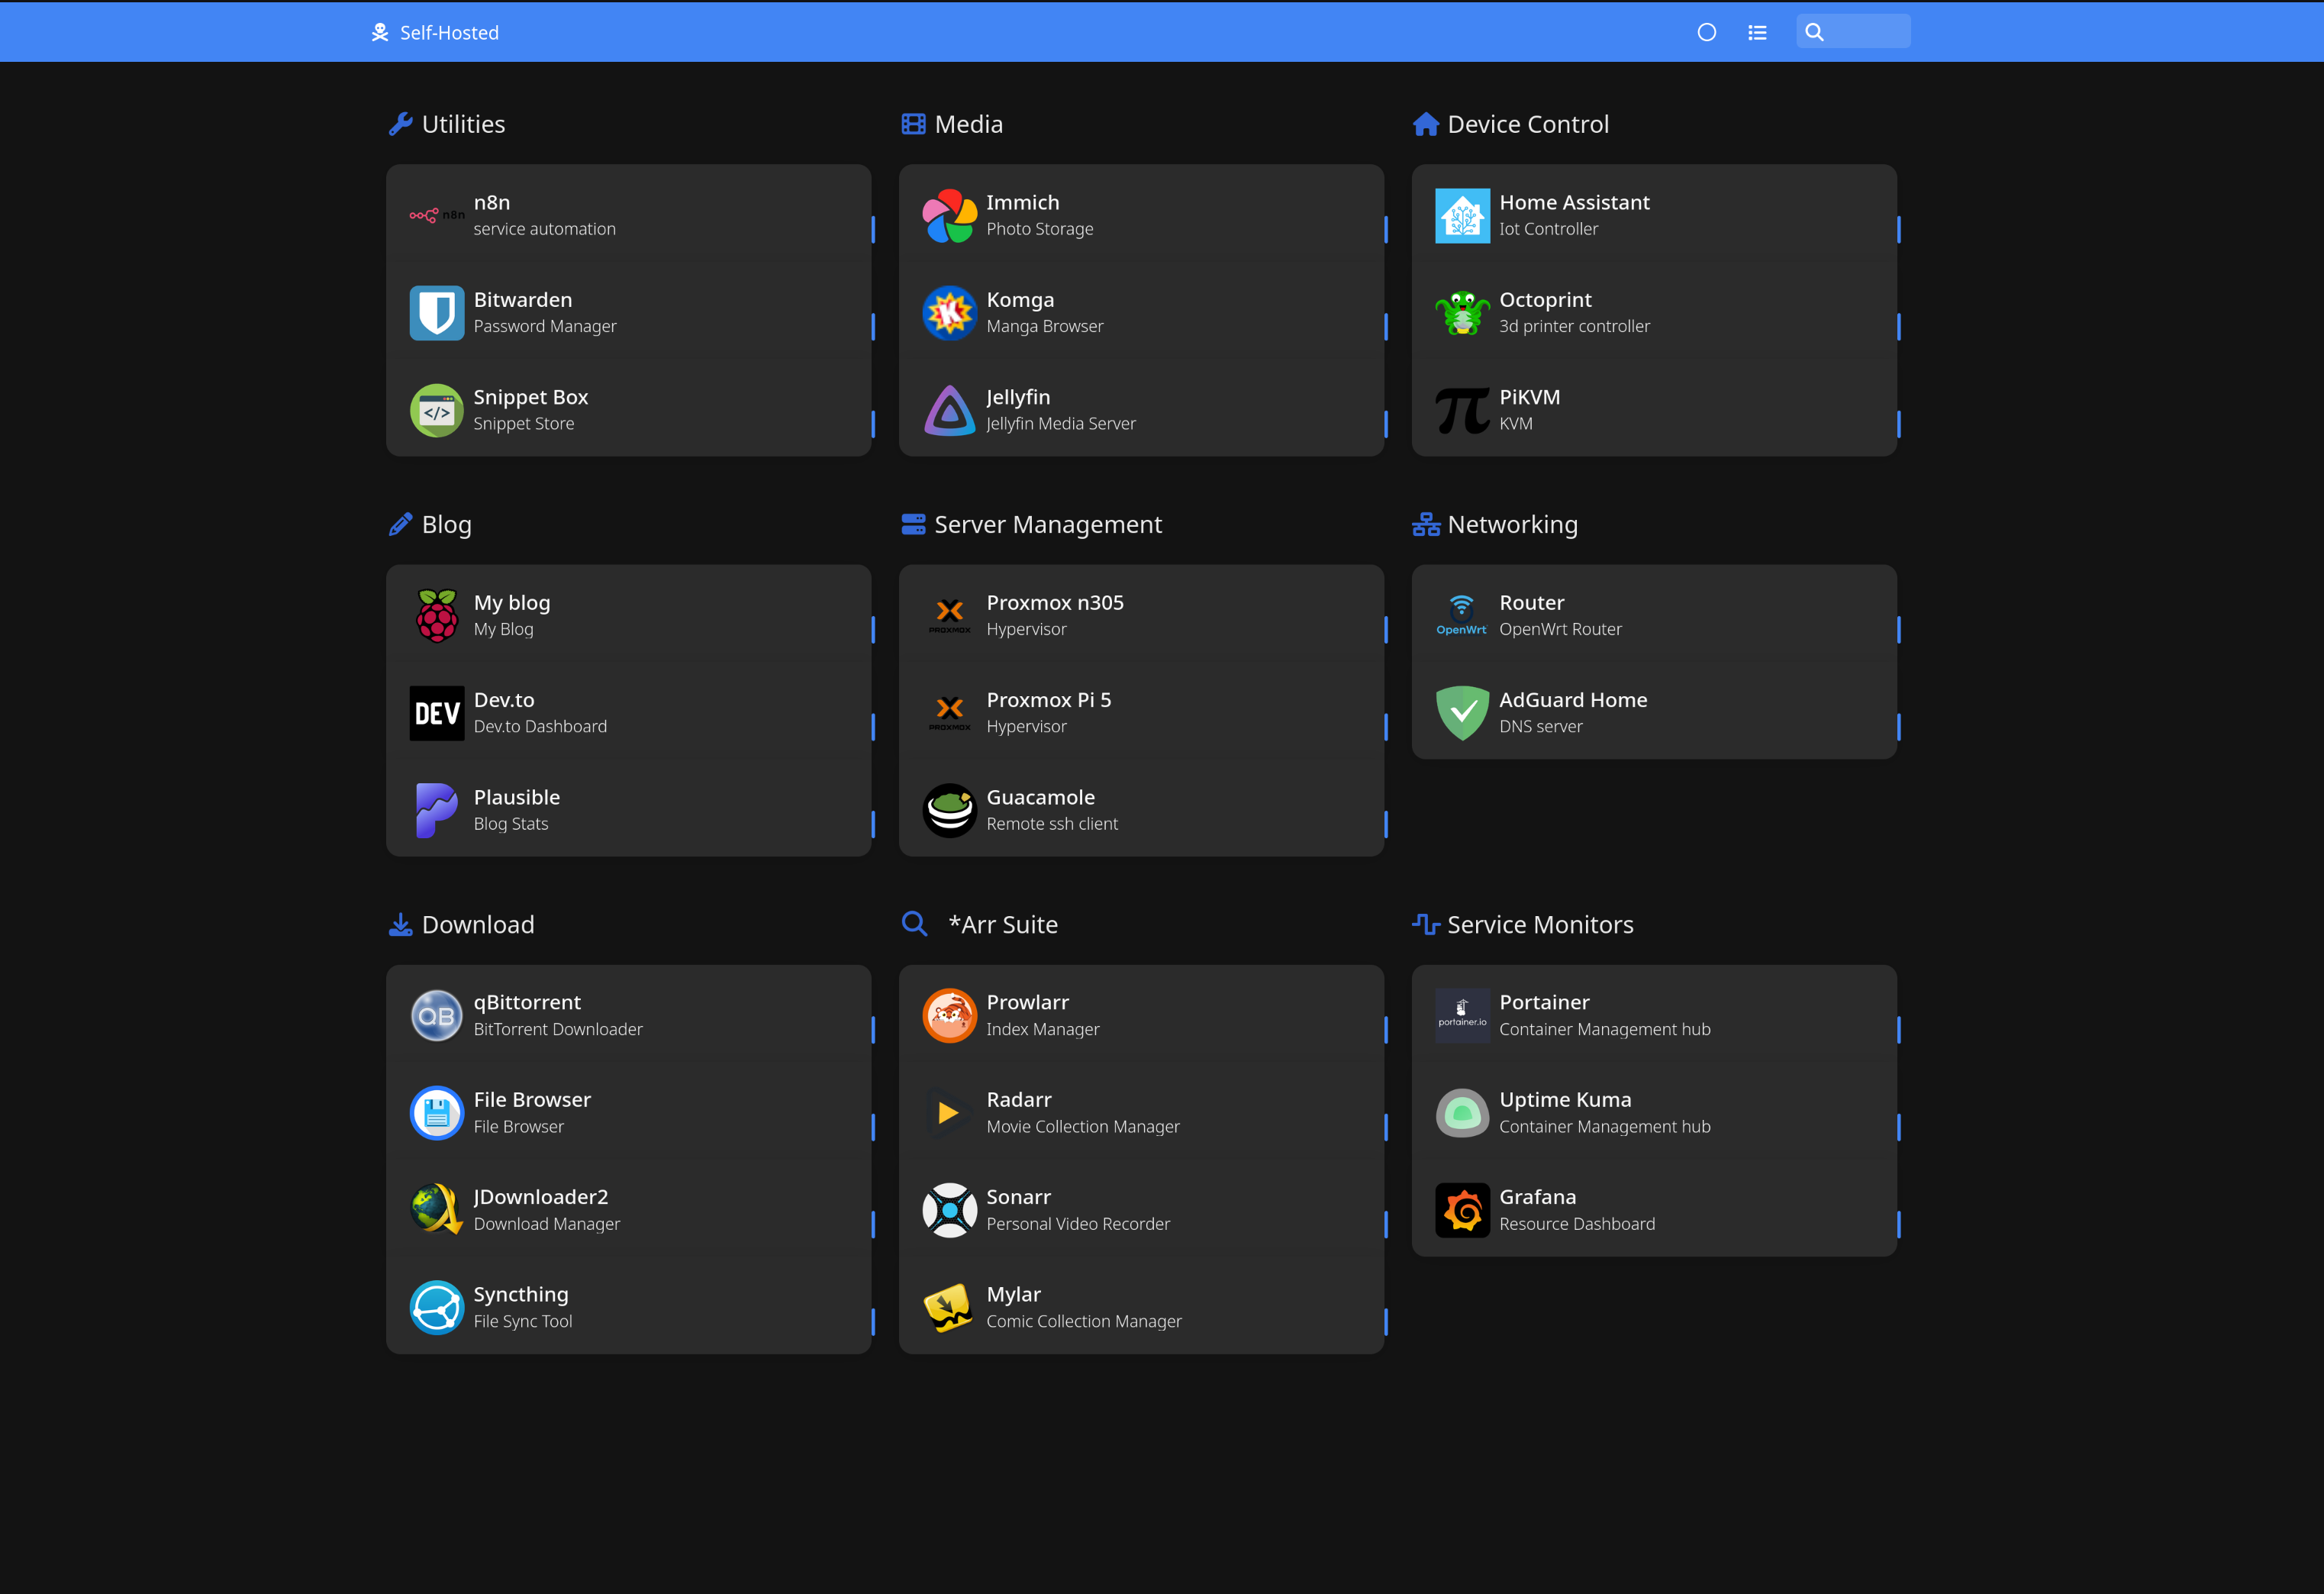
Here’s my actual setup - services running across Raspberry Pis, an N305 mini PC, and other devices, all proxied through the OpenWrt One. Every service accessible via clean subdomain URLs with HTTPS:
| Service | Subdomain | Backend |
|---|---|---|
| Homer (Dashboard) | homer.raspberrypi.home | 192.168.1.201:8080 |
| Grafana | grafana.raspberrypi.home | 192.168.1.201:3000 |
| Prometheus | prometheus.raspberrypi.home | 192.168.1.201:9090 |
| Home Assistant | homeassistant.raspberrypi.home | 192.168.1.213:8123 |
| Jellyfin | jellyfin.raspberrypi.home | 192.168.1.201:8096 |
| Portainer | portainer.raspberrypi.home | 192.168.1.201:9000 |
| Bitwarden | bitwarden.raspberrypi.home | 192.168.1.201:8081 |
| qBittorrent | qbittorrent.raspberrypi.home | 192.168.1.201:8090 |
| Komga | komga.raspberrypi.home | 192.168.1.201:8082 |
| Uptime Kuma | uptimekuma.raspberrypi.home | 192.168.1.201:3001 |
| Syncthing | syncthing.raspberrypi.home | 192.168.1.201:8384 |
| Guacamole | guacamole.raspberrypi.home | 192.168.1.201:8083 |
| PiKVM | pikvm.raspberrypi.home | 192.168.1.100:443 |
| OctoPrint | octopi.raspberrypi.home | 192.168.1.101:80 |
| … | … | … |
Every service is accessed through https://servicename.raspberrypi.home on port 443. You don’t need to remember different port numbers - nginx reads the subdomain from the URL and forwards your request to the correct backend service internally.
OpenWrt centralizes all logs through logread. To view nginx logs:
logread | grep nginx
By default, access logging is disabled (access_log off) since router storage is limited. Error logs still go to the system log and are accessible via logread.
UCI configurations live in /etc/config/. Location files are in /etc/nginx/conf.d/. Back these up:
# Create backup
tar -czf nginx-backup.tar.gz /etc/config/nginx /etc/nginx/conf.d/ /etc/nginx/ssl/

# Restore
tar -xzf nginx-backup.tar.gz -C /
Some services need to know they’re behind a reverse proxy. Nginx alone isn’t enough - you need to configure the service itself. For example, Grafana requires:
environment:
  - GF_SERVER_ROOT_URL=https://grafana.yourdomain.home
Without this, Grafana fails to load its assets through the proxy. Check your service’s documentation for reverse proxy settings if things don’t work after setting up nginx.
This post covered local access to your homelab services. In an upcoming post, I’ll cover remote access - setting up WireGuard on OpenWrt to securely reach your services from anywhere.
Running nginx on your OpenWrt router leverages hardware you already have running 24/7. It eliminates network hops, centralizes configuration with DNS, and provides a clean subdomain-based access pattern for all your services.
The combination of OpenWrt’s UCI system and nginx’s flexibility creates a maintainable setup that scales from a handful of services to dozens. My 25-service configuration runs on minimal resources and has been rock solid.
Start with one or two services, get comfortable with the UCI workflow, and expand from there. Your router is more capable than you might think.
I write weekly about homelabs, monitoring, and DevOps. If you found this helpful, check out my other posts or subscribe on Dev.to for more practical guides like this one.